
Disclaimer: I am not an expert on your car. I am providing this "how-to" solely as a contributing member on this board and cannot guarantee your results nor do I accept any responsibility for improperly following my procedures or resulting in broken parts. The outlining steps herein are based only on my personal experience in the matter. Perform this procedure at your own risk.
Now, contrary to popular belief, the factory D3S HID bulbs DO NOT twist out clockwise or counterclockwise. Let's just put that to rest right now. Instead, the bulbs are attached to a bracket and two (2) T10 torx/star key screws hold them on to the headlight assembly.
Here are the required/recommended tools:
![Image]()
In order to provide the best "how-to" possible, I removed the headlight assemblies to get a better look.
Here are the locations of the screws that need to be removed in order to take the headlight assembly off:
Engine bay; Top view, Passenger side:
![Image]()
Engine bay, Top view, Passenger side, close-up front:
![Image]()
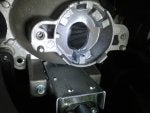
The lower T30 headlight screws are a PITA to access and remove. You have to jack up the vehicle, remove the wheels, remove the wheel well liner, and maneuver the 1/4" drive ratchet with the bit holder and T30 bit into very tight quarters. There's maybe 4" between the head of the screw and the fender. Once I 'broke the screw loose' with the ratchet and T30 bit, I used a dime (10 cent piece) to undo it the rest of the way (yes, there's a slot in the screw head, too)... took about 20 minutes to remove the passenger side (horns take up space), and 10 minutes on the driver side:
![Image]()
Exercise care when removing the headlight assembly. Unplug the main wiring harness and the amber side marker. Pay special attention to the plastic brackets/flaps and areas near the grille and bumper. There is also a groove on the bottom front of the headlight assembly that the bumper fastens into. Gently and patiently wiggling it away from its fastening points will save you frustration and broken parts.
Once the headlight assembly is removed, this is what it looks like when viewing into the low-beam housing (in the picture below, I have already removed one of the T10 screws):
![Image]()
Remove the two T10 torx screws and unplug the HID light harness/plug (I used a small telescopic magnet to ensure I didn't drop the screws into the housing. and I used a small flat head screwdriver to 'pry' the plug off of the light) :
![Image]()
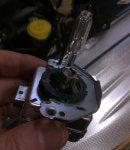
Here is a side-by-side comparison of the factory D3S light assembly (left) and the aftermarket one I'm installing (right). Note the bracket on the factory assembly that needs to be transferred to the new one. The bracket slides off in one direction making it easy to transfer. Installing the bracket on the new one is simply performed by orientating it in the same direction/location as it was on the original light, and lining up a notch in the bracket:
![Image]()
Next, re-install everything in reverse order (don't forget to plug the wiring harness back into the headlight assembly) and test operation before finalizing - you don't want to get everything reassembled and off the jacks before realizing your install didn't succeed")
Here are the after shots:
Daytime, taken in the garage:
![Image]()
Night shot; low-beams only:
![Image]()
Night shot; low-beams and fogs:
![Image]()
I'll conclude that it may be possible to perform this procedure without removing the headlight assemblies - at least, now that we all know what's involved - but it had to be done in this case for that determination. In the future, I don't think I'd risk dropping one of those little T10 screws or fussing with the D3S harness/plug - especially since you can't see what you're doing without the headlight assembly removed.
-Cheers!
Now, contrary to popular belief, the factory D3S HID bulbs DO NOT twist out clockwise or counterclockwise. Let's just put that to rest right now. Instead, the bulbs are attached to a bracket and two (2) T10 torx/star key screws hold them on to the headlight assembly.
Here are the required/recommended tools:

In order to provide the best "how-to" possible, I removed the headlight assemblies to get a better look.
Here are the locations of the screws that need to be removed in order to take the headlight assembly off:
Engine bay; Top view, Passenger side:

Engine bay, Top view, Passenger side, close-up front:

The lower T30 headlight screws are a PITA to access and remove. You have to jack up the vehicle, remove the wheels, remove the wheel well liner, and maneuver the 1/4" drive ratchet with the bit holder and T30 bit into very tight quarters. There's maybe 4" between the head of the screw and the fender. Once I 'broke the screw loose' with the ratchet and T30 bit, I used a dime (10 cent piece) to undo it the rest of the way (yes, there's a slot in the screw head, too)... took about 20 minutes to remove the passenger side (horns take up space), and 10 minutes on the driver side:

Exercise care when removing the headlight assembly. Unplug the main wiring harness and the amber side marker. Pay special attention to the plastic brackets/flaps and areas near the grille and bumper. There is also a groove on the bottom front of the headlight assembly that the bumper fastens into. Gently and patiently wiggling it away from its fastening points will save you frustration and broken parts.
Once the headlight assembly is removed, this is what it looks like when viewing into the low-beam housing (in the picture below, I have already removed one of the T10 screws):

Remove the two T10 torx screws and unplug the HID light harness/plug (I used a small telescopic magnet to ensure I didn't drop the screws into the housing. and I used a small flat head screwdriver to 'pry' the plug off of the light) :

Here is a side-by-side comparison of the factory D3S light assembly (left) and the aftermarket one I'm installing (right). Note the bracket on the factory assembly that needs to be transferred to the new one. The bracket slides off in one direction making it easy to transfer. Installing the bracket on the new one is simply performed by orientating it in the same direction/location as it was on the original light, and lining up a notch in the bracket:

Next, re-install everything in reverse order (don't forget to plug the wiring harness back into the headlight assembly) and test operation before finalizing - you don't want to get everything reassembled and off the jacks before realizing your install didn't succeed
Here are the after shots:
Daytime, taken in the garage:

Night shot; low-beams only:

Night shot; low-beams and fogs:

I'll conclude that it may be possible to perform this procedure without removing the headlight assemblies - at least, now that we all know what's involved - but it had to be done in this case for that determination. In the future, I don't think I'd risk dropping one of those little T10 screws or fussing with the D3S harness/plug - especially since you can't see what you're doing without the headlight assembly removed.
-Cheers!